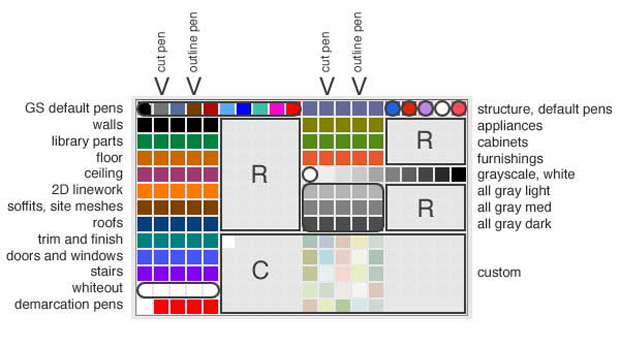
A bit about the BDA pen tables for ArchiCAD.
Drawings are the holy grail of 3D CAD software, as far as I can tell. It’s not too hard to model something in 3D. Modeling in such a way that the model also works for 2D publishing can be vexing. 2D sheets of paper are the vehicle for all our beautiful 3D thinking. Mastering pen assignments will make it easier for us to make the leap back to 2D.
The pen table is comprised of thirteen rows and twenty columns. Columns are weight, usually. Rows are building systems, usually.
We’ve organized the rows into groups of five, each group with a consistent color to help ID different building systems.
Pen weight is consistent down each column. Within each group of five, weights change left to right from heavy to light. The pen ending in 1 (21, 51, 101) is always heavy, the pen ending in 5 (25, 55, 105) is always light.

- The ones and the fives are too extreme for everyday use. Two is the default cut pen. Four is the default line pen.
- The first ten pens we avoid using at all – these are the nonsensical Graphisoft default pens. Our pen table sets the weights of all these pens to a consistent .5 pt. Objects from the AC library will default to these pens (read: windows, doors).
- Section cuts are always pen 16.
- Text is always pen 17.
- Light text is always pen 18.
- Pen 19 is reserved for international library parts – for the rest of the world nineteen is the default white. For North America white is always pen 91.
- Dimensions are always pen 20.
- White per above is always pen 91.
- Pens 221-225 are whiteout pens – use them to whiteout lines projected from the 3D model that aren’t helping the 2D drawing.
- Pen 241 is a legacy white pen – many old library parts use 241 as white – so we’re leaving it alone for now.
- Pens 242-245 are used for strong demarcation lines on a plan – limits of work and such. We probably have too many of these but there you are until next revision.
- The areas marked “R” are reserved.
- The area marked “C” is open for custom use. Be sure to read up on how to redefine a pen set – then feel free to use the color that’s right for the job.
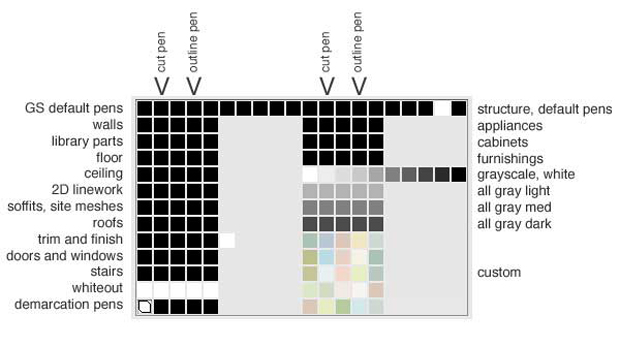
Finally – please read and understand the concept behind modeling pens versus printing pens.

If you study the image above you can pretty much see what happens when we print. All the colors so useful in modeling become black, with two three exceptions:
- designated white pens – used for occluding fills or white-out
- gray-scale pens – for things that need to print gray
- custom color pens – which translate through from the modeling pen set in WYSIWYG fashion for printing.
Note than when you create a new custom color pen on the modeling side, you must duplicate this pen and its color on the printing side – or you’ll get the default gray color on your plot or PDF.